Sunday, October 28, 2012

Week #38 - Owlet Jumper

Following up on my preview post earlier this week, I'm pleased to announce that I'm ready to show off my Kate Davies creation, having completed her 'owlet' jumper pattern. Have a look at her completed version below:

Photo by Kate Davies Design

This little jumper really was a joy to complete. Because it is baby-sized, it didn't take long to knit up and because the jumper knits from bottom to top, you knit the little owls last which means you build up to and savour working on the best part of the jumper.

I followed Kate's simple step-by-step guidelines, choosing to knit a jumper for size 18-24 months. Though if you wanted to make a different size, the same pattern has easy to follow instructions to knit up a jumper from 6 months to 10 years. The pattern gives clear instructions and advice on what materials and needles you'll need, as well as notes regarding the fit and gauge you are knitting to.

Once you have knit your jumped you can have a bit of fun choosing buttons to give it the right look and really bring your owls to life. 

I'd really recommend this pattern to knitters of all backgrounds - for an expert it would knit up quickly, and for someone relatively new it presents a good challenge with a few new techniques... but without being too overwhelming a project. It is certainly a good confidence builder for knitters of all levels.

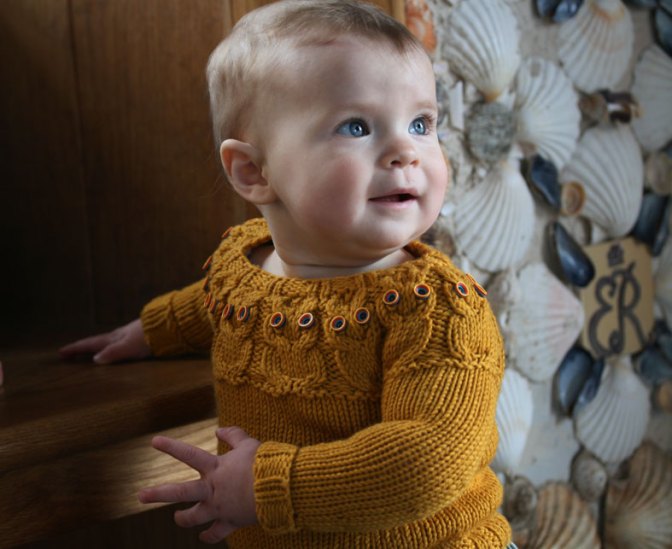
Here is how my Owlets turned out:


What do you think? I used a mousey-brown colour with hints of lights and dark highlights to give a nice texture and make sure that the jumper was unisex. I thought the colour was nice and muted, but that the highlights gave it a bit of a warmer tone.  Plus I found dark buttons with a little highlight in the centre to really make the owl eyes stand out.

Now that I've completed one of Kate's projects, I'm afraid I might not be able to stop. I have my eyes on some of the more complicated ones, and think I might rewards myself at the of my 52 weeks : 52 crafts project with a new knitting project in January that will be just for me!

This jumper will of course be on auction for Macmillan Cancer Support. Please see the auction for more information, including size and measurements.

The auction will start tonight (Sunday Oct. 29th and run through to November 5th).

Plus, stay tuned as there are plenty of new auctions to come and as of Nov. 1st I'm launching a little 52 weeks : 52 crafts round up to help you get going on your Christmas shopping and help raise more funds for Macmillan Cancer Support!

Wednesday, October 24, 2012

Week #38 Preview - Designer Kate Davies

I'm really pleased to give a little preview to this week's craft by featuring Kate Davies, an incredible designer, writer, blogger and knitting expert based in Edinburgh.

I first came across Kate quite some time ago, while having a short internet break at work - I immediately bookmarked her site as something to 'come back to'... but as it often happens, I didn't quite get around to revisiting her site for some time.  Then I came across her site again earlier this year when she was having some trouble with people reproducing and selling her patterns as well as a dispute with Debenhams over the use of the pattern (which I'm happy to say was resolved soon after!)

If you browse Kate's website you'll see that she has produced quite a wonderful selection of patterns, with a range suitable for both beginners and experts... visit http://katedaviesdesigns.com/designs/ to see just a few.

One my favourites is her absolutely breaktaking Yams and Rowes blanket.


Photo: Kate Davies Designs

Now due to my knitting skill level, and the fact that I only have a week to complete each project I didn't quite have the time-resources to take on this blanket, I have however completed another of Kate's projects and will be posting my result and review of the pattern later this week.

Have a browse of Kate's website and see if you can guess which one I made!

Many thanks of course to Kate, who has allowed me to use her pattern and sell what I made to raise funds for Macmillan Cancer Support!

If you'd like more information on the 52 Weeks: 52 Crafts project, <== click this link to see some of the other projects I made and find out what is up for auction this week.


Sunday, October 21, 2012

Week #37 - Saucy Saucepan Holders

Just doing a little catch up here at Lazy Crafternoons to bring you Craft #37 and a new tutorial for making saucy little saucepan holders! (Although yours don't have to be so saucy).

I have had a few 'out-there' prints lying around from some swaps I've done which I've been struggling to find a use for - It's not that they aren't great prints, they just are so bold and bright (and one a bit saucy) that I haven't known what to do with them... So I decided to use this 'Look of Love' Fabric by  and this 'Los Novios' Bride and Groom fabric, both of which are by Alexander Henry.

To make your potholders and pot 'pinchers' you'll need to cut and prepare

Main Fabric
- 2 x 7" squares (pot holder) and
- 2 x 8"x4"rectangles (pot pincher body)
- 2 x 4"x3"rectangles (pinching pockets)
Binding Fabric
- 2 x 4"x3"rectangles (pinching pockets)
- 2 x 2.5" strips at least 28 inches long and/or sewn together to get that length
Heat Proof Wadding
- 1 x 7 inch square
- 1 x 8"x4" rectangles
- 2 x 3"x4" rectangles

You'll also need thread, a sewing machine and a hand sewing needle (a rotary cutter, quilter's square and cutting mat would also be a big help, but are not necessary).

Step 1 - Cut it out. Cut your fabrics and wadding and lay them all out. I cut my wadding and backing piece slightly larger and trimmed them after quilting, but this was not necessary. You can cut all your pieces to the correct sizes for the first steps.


Step 2 - Round your corners. Round the edges of your squares with a gentle curve (I folded the piece into four and cut all corners together - see photo).

At the same time round two corners of your pinching pocket pieces (3"x4" pieces) as in the photos below.

Then use your rounded corners to shape the corners of your rectangle by laying your rounded pieces on top.

You'll have one square with 4 rounded corners, two rectangles with 4 rounded corners, two smaller pieces with two rounded corners and your binding colour fabric pieces still not rounded... plus your wadding pieces.


Step 3 - Get your quilt on. Layer your quilt sandwiches with your wadding between the front and back pieces for both the square and rectangle, and quilt them any way you like (curvy quilting, straight quilting, it's up to you!).


Step 4 - Your Pinching Pockets.  Lay your 3"x4" rectangle with rounded corners on top of your 3"x4" rectangle cut form your binding fabric and lay that on top of your wadding pieces of the same size.

Stitch down the long (non-curved) edge of your pieces with a 1/4 inch seam stitching through all three layers.

Turn your pieces right side out by folding at your seam and pressing, then sew a finishing stitch 1/4 inch from the edge.

Trim down the corners of the wadding and binding colour fabric to match your main fabric.

Step 5 - Hanging Option. If you want to have a little tag for hanging your potholder, then create one by taking a 2.5 inch by 5.5 inch strip and pressing it so that the raw edges are pressed into the centre. (Press the raw edges to the centre and then press again along the centre line).  Sew this with finishing stitches down each side.

Trim this piece to your desired length, and baste in place in the centre of one edge of your square potholder.
At the same time, baste stitch the pockets to your quilted pot pincher so that both your Square and Rectangle pieces are ready for binding. 


Step 6 - Bind away. Press 1/2 inch in at one end of your binding strip and sew a finishing stitch 1/4 inch away from the edge. Press your binding in half lengthwise so you have one folded edge and one raw edge.

Attach your binding to the edge of your potholders by lining the raw edges of your binding with edges of your potholder. Leave a 2-inch tail and begin sewing, pinching and pleating around the corners as you go.


When you have sewn all the way around, stop sewing and cut your thread so that you have a tail that overlaps the one you left at the start of your binding.  Trim the tail with the raw edge so that it overlaps your tail with a finished edge by at least an inch, and then tuck it inside so that your finished tail shows. Sow the remaining gap to finish attaching your binding.

Step 7 - Attach your binding to the front. Fold your binding around from the back to the front, and attach it with a top stitch (although your stitches will show through the other side) or hand stitch it by sewing around the perimeter of your pieces.

Repeat the binding steps for your smaller pot pincher, being sure you catch the edges of your pockets as you sew around the perimeter of your pincher.

Check out these little beauties!


These little beauts will be on sale on Ebay starting tonight, along with a few other items left over from the last few weeks crafting! please check them out and bid generously!

Ebay auctions will appear below as they go live.

Sunday, October 7, 2012

Week #36 - Hanging Hoopla

Having little catch up sesh here at Lazy Crafternoons and posting the second craft of the week today with these lovely hanging hoop organisers for your craft room or study. (The first craft being these sweet little mini-cushions)

As you may or may not know, I've been quite obsessed with using embroidery hoops as fun displays for photos, fabric and other bits and bobs, having used them before back in Week #18 ... so I've been having a bit of 'a think' and have been coming up with a few ways to put them to use while also making them functional.

I've come up with a few ideas, the first of which I've seen done by a few people here and there (please don't allow me to take credit for the overall idea for this!) and so I wanted to try to make a hanging hoop organiser with my own little spin on it.

Why not brighten up your craft space with one of these?


It looks great up on the wall and helps you keep your essentials within reach and in perfect order!

I put my own little spin on it, by adding some wadding to make it a little more plush and soften the effect of the 'pockets', and stiched the pocket lines from the bottom up, turning around, and then stitching back down, so I didn't have to have any back stitching showing or tie in any loose ends.

This item, will as always, be listed on ebay starting tonight with 100% of the sale going to Macmillan Cancer Support. check out the auction and others here;

Check out the auctions as they go live this evening below:

(please note, this little widget only updates once an hour so you may have less time to bid than you think!)

Week #35 - Mini Cushions Galore!

Before I tell you all about project #35, I just wanted to report that with thanks to The Folkhouse Cafe and bar, and all those who came along to make bookmarks or donate, I was able to add an additional £35.00 for the ongoing total for Macmillan which makes week #34 a success.

This week I decided to do something a little bit different. As a quilter I hoard fabric and never get rid of small scraps, at the same time when I buy new fabric I  hold on tightly to my new big pieces of fabric, not wanting to cut into them.  This results in my saving lots of little scraps 'just in case' and on the flip side, hoardings loads of gorgeous graphic prints until I know what to do with them.

Lately I've been doing lots of cushion making; cushion making courses, cushions for sale, patchwork cushions and on, and on.  Now cushions are a great way to play with your stash, because they let you play with fabrics on a small scale and you can cut into your bigger pieces and work with them, without committing loads of your yardage. You can play with the fabrics while still saving enough for something bigger.

While I always get lots of praise for my big cushions, be it patchwork cushions or ones made with bold prints, they don't always sell on my stall or in shops because decor is so personal and I tend to use quite bold colours and contrasting patchworks...

So after a little inspiration from my trip to Argentina, I've decided to introduce: the mini cushion!


Such a simple idea, and yet so effective. Add a splash of colour or a bit of whimsy, without having to go the whole nine yards and buy a 16-inch whopper.  These little cushions are so fun, and they are also great stacked and bundled up as gifts.


The beauty is that I'm only work with small bits of fabric, so they don't cost much to make and they are quick and simple!

I'll be auctioning off two of these little cushions this week on E-bay.... and do stay tuned because I'm catching up and week #36's craft is coming your way this evening!


Check out the auctions as they go live this evening below: